Experimental Tool Configuration
Tool Configuration Demonstration
The configuration of ReVision is provided by so-called Eclipse plug-in projects. ReVision provides project setup wizards for the configuration of consistency rules (aka. constraints) and edit rules (aka. consistency-preserving edit operations) plug-in projects.
In general, the project wizards can be found in Eclipse:
File -> New -> Other... -> ReVisionConstraint Plug-in ProjectEdit Rule Plug-in Project
Definition of Consistency Rules
As the first step, we create a plug-in project that specifies the consistency rules for an existing modeling language, i.e., a meta-model defined using the Ecore modeling language. In Eclipse go to:
File -> New -> Other... -> ReVision -> Constraint Plug-in Project
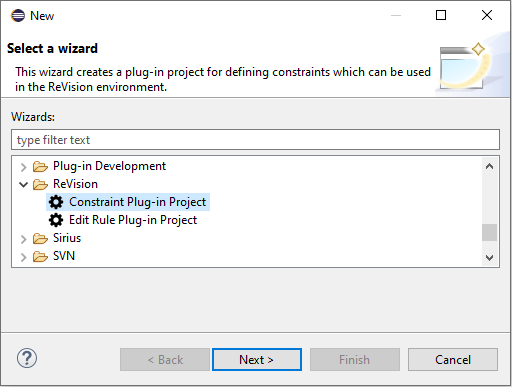
Select the Constraint Plug-in Project wizard and click Next.
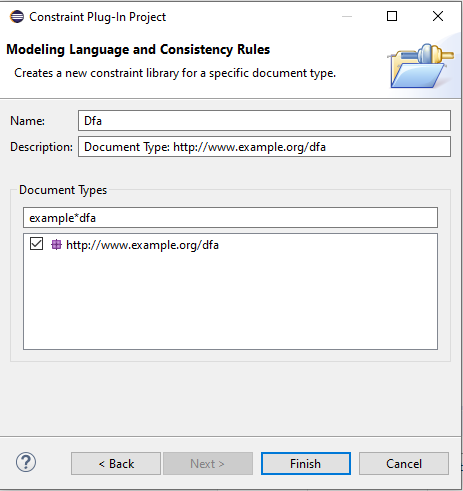
Specify a Project name, e.g., io.repairvision.github.<modeling language name>.constraints.
The remaining settings should look similar to Fig. 2.

In the project wizard, click Next.
Specify a plug-in Name, e.g., Constraints <Modeling Language Name>.
The remaining settings should look similar to Fig. 4.

On the Next page, specify the Document Types, i.e., the meta-model of the modeling language.
Use the search field to find the meta-model by its namespace URI.
(!) Please note that this assumes that your meta-model is registered in the Eclipse instance you are currently running.
If you are in the workspace in which you develop your meta-model, you have to run a second Eclipse instance with that meta-model registered and loaded, e.g., from the plugin.xml -> Overview (Tab) -> Testing (Section) -> Launch an Eclipse application.
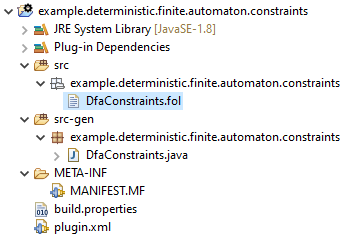
Clicking Finish initializes your new plug-in in the Eclipse Workspace (check your Project Explorer).
If not automatically opened, go to and open the constraint definition file (see Fig. 10 and 7):
io.repairvision.github.<modeling language name>.constraints -> src -> io.repairvision.github.<modeling language name>.constraints -> <modeling language name>.fol
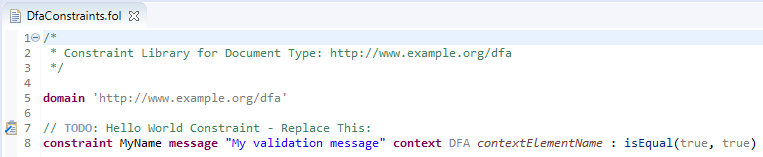
The *.fol file first specifies the modeling language by the domain keyword and the namespace URI of the modeling language’s Ecore meta-model.
This line should have been already inserted by the project wizard.
After that, you can define the consistency rules.
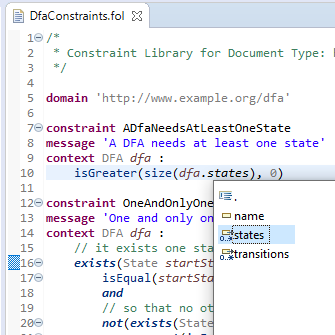
As shown in Fig. 8, a consistency rule definition starts with the constraint keyword, followed by a unique name for the constraint and a colon :.
The second keyword message defines a description for the developer that is shown if the constraint is violated.
Next, after the context keyword the context type is specified, i.e., the type of the context element in a model’s abstract syntax tree starting from which the constraint is validated.
For example, in Fig. 8, the context type is DFA and the variable dfa refers to the context element (similar to self in OCL).
Moreover, as shown in Fig. 8, the editor supports auto-completion (ctrl+space) for meta-model types and syntax fragments.
The constraint must be a Boolean expression that is validated on the context element. A constraint can be constructed using the following grammar. For the sake of readability, terminals in the following grammar definition are enclosed with a space rather than quotation marks:
<Constraint> ::= constraint <RuleName> message <String> context <Variable> : <Formula>
<RuleName> ::= <ID>
<Variable> ::= <EClassifier> <VarName>
<VarName> ::= <ID>
In general, IDs are unique names that can be referenced in a certain scope.
IDs that conflict with keywords can be escaped by a ^ prefix.
Strings are surrounded by ' or " quotation marks with the escape sequences \" and \'.
Escape sequences starting with \ are only allowed for the literals\b, \t, and so on.
<ID> ::= ( ^ )?( a..z | A..Z | _ )( a..z | A..Z | _ | 0..9 )*
<String> ::= " ( \b | \t | \n | \f | \r | \u | \" | \' | \\ | !( \ | " ))* "
           | ' ( \b | \t | \n | \f | \r | \u | \" | \' | \\ | !( \ | ' ))* '
<Integer> ::= ( 0..9 )+
<Boolean> ::= true | false
A formula computes a Boolean value; a binary formula combines two Boolean formula results; a predicate computes a Boolean value from a term; and a quantifier computes a Boolean value by evaluating a formula on all elements in a given set.
<Formula> ::= <Boolean> | <BinaryFormula> | <Predicate> | <Quantifier>
            | not( <Formula> ) | ( <Formula> )

<BinaryFormula> ::= <Formula> = <Formula>
                  | <Formula> implies <Formula>
                  | <Formula> xor <Formula>
                  | <Formula> or <Formula>
                  | <Formula> and <Formula>

<Predicate> ::= isEqual( <Term> , <Term> )
              | isGreater( <Term> , <Term> )
              | isGreaterEqual( <Term> , <Term> )
              | isSmaller( <Term> , <Term> )
              | isSmallerEqual( <Term> , <Term> )
              | isEmpty( <Term> )
              | isInstanceOf( <Term> , <EClassifier> )
              | isValueLiteralOf( <Term> , <EDataType> )

<Quantifier> ::= forAll( <Variable> in <Term> : <Formula> )
               | exists( <Variable> in <Term> : <Formula> )
A navigation expression starts at a variable, e.g., state, followed by the name of the attribute or reference (EStructuralFeature) in the meta-model, e.g., state.isStart.
A type cast is performed by :: followed by the type’s name (EClassifier) in the meta-model, e.g., transition.to::State.name if transition.to would return an abstract type like Vertex.
The constraint editor supports auto-completion for such navigation expressions or type casts.
<Term> ::= <VarName>< . <<EClassifier> :: >?<EStructuralFeature>>+
         | getContainer( <Term> )
         | getContainments( <Term > )
         | getClosure( <Term> , <EStructuralFeature> )
         | size( <Term> )
         | indexOf( <Term> , <EStructuralFeature> , <Term> )
         | concatenate( <Term> , <Term> )
         | capitalize( <Term> )
         | asClassifier( <Term> )
         | asDataType( <Term> )
         | <Integer> | <String> | <Boolean>
Fig. 10 shows a meta-model for a simple Deterministic Finite Automaton (DFA).
Please note that a navigation expression term that returns an EBoolean, e.g., state.isStart, (currently) has to be converted explicitly to a Boolean, e.g., isEqual(state.isStart, true).
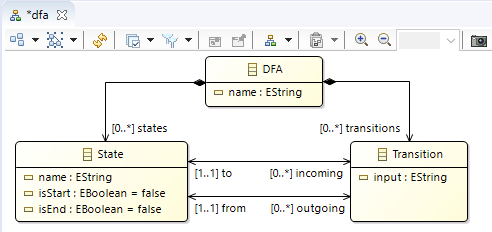
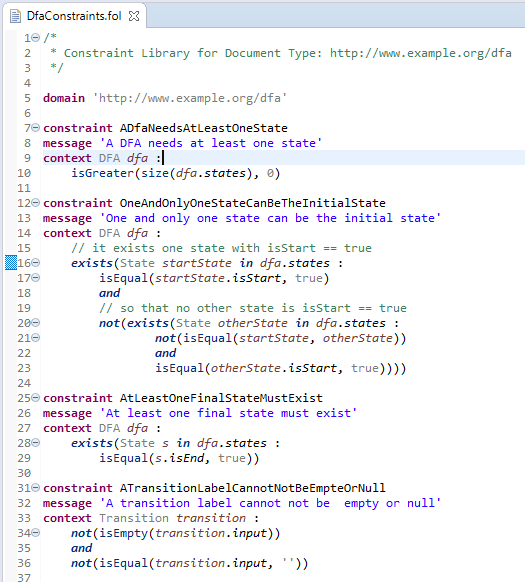
Fig. 11 shows some example consistency rules for this DFA.
Definition of Edit Rules
The next step is to create a plug-in project that specifies the edit rule (aka. consistency-preserving edit operations) for an existing modeling language, i.e., a meta-model defined using the Ecore modeling language.
(!) Please note that this assumes that your meta-model is registered in the Eclipse instance you are currently running.
If you are in the workspace in which you develop your meta-model, you have to run a second Eclipse instance with that meta-model registered and loaded, e.g., from the plugin.xml -> Overview (Tab) -> Testing (Section) -> Launch an Eclipse application.
(!) Moreover, if you want to initialize the edit rules based on the specified constraints, the constraint plug-in must be registered in the Eclipse instance you are currently running.
If you are in the workspace in which you developed your constraints, you have to run a second Eclipse instance with that constraint plug-in registered and loaded, e.g., from the plugin.xml -> Overview (Tab) -> Testing (Section) -> Launch an Eclipse application.
(!) To avoid nesting multiple Eclipse workspace instances (meta-model development -> constraint development -> edit rule development), you can import (File -> Import -> Existing Projects into Workspace) the constraint plug-in into your primary meta-model development workspace.
You can link the project instead of copying it.
Than start a second Eclipse instance from the primary workspace.
If you make changes to the configuration you may have to reload the second instance.
(Basically, edit rules will be dynamically reloaded, change to constraints are not.)
To initialize an edit rule plug-in project, go to:
File -> New -> Other... -> ReVision -> Edit Rule Plug-in Project
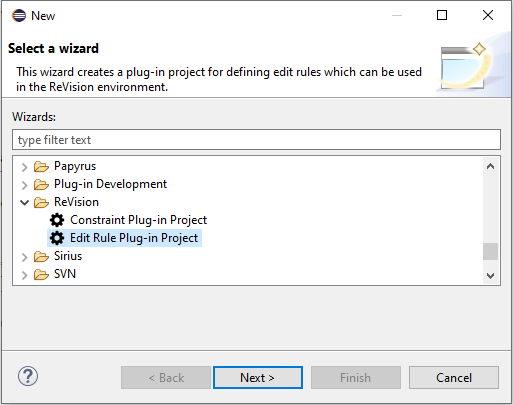
Select the Edit Rule Plug-in Project wizard and click Next.
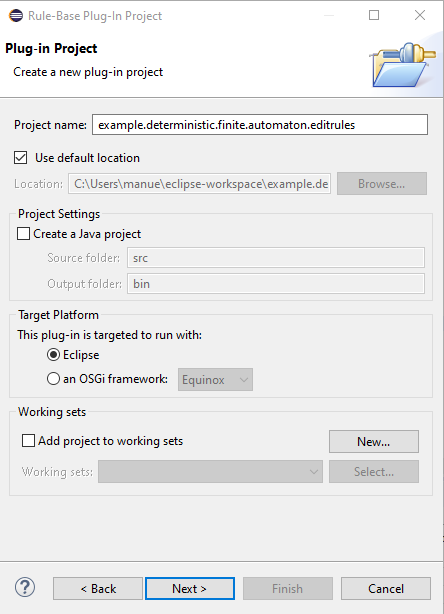
Specify a Project name, e.g., io.repairvision.github.<modeling language name>.editrules.
The remaining settings should look similar to Fig. 13.
In the project wizard, click Next.
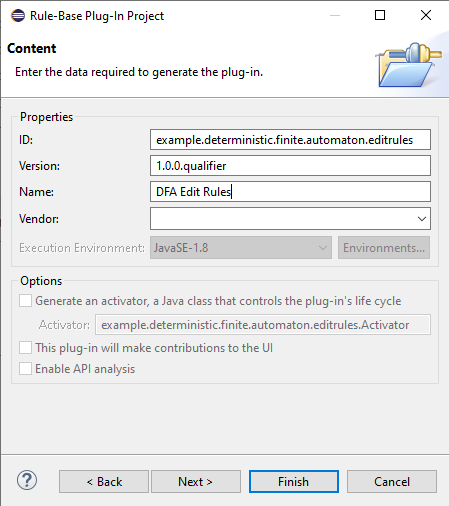
Specify a plug-in Name, e.g., Edit Rules <Modeling Language Name>.
The remaining settings should look similar to Fig. 14.
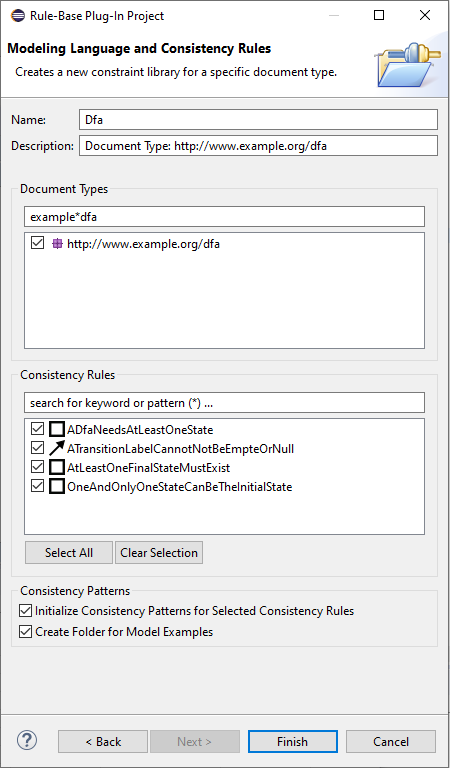
On the Next page, specify the Document Types, i.e., the meta-model of the modeling language.
Use the search field to find the meta-model by its namespace URI.
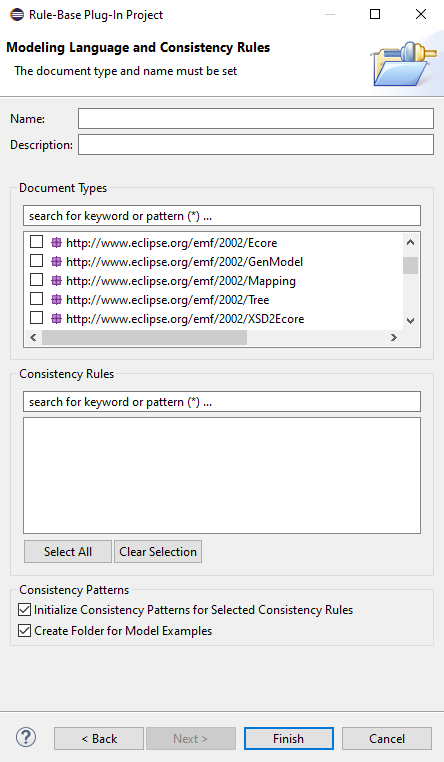
On the same page (see Fig. 16), if registered consistency rules are found, you can select the constraints for which the wizard will infer simple initial edit rules.
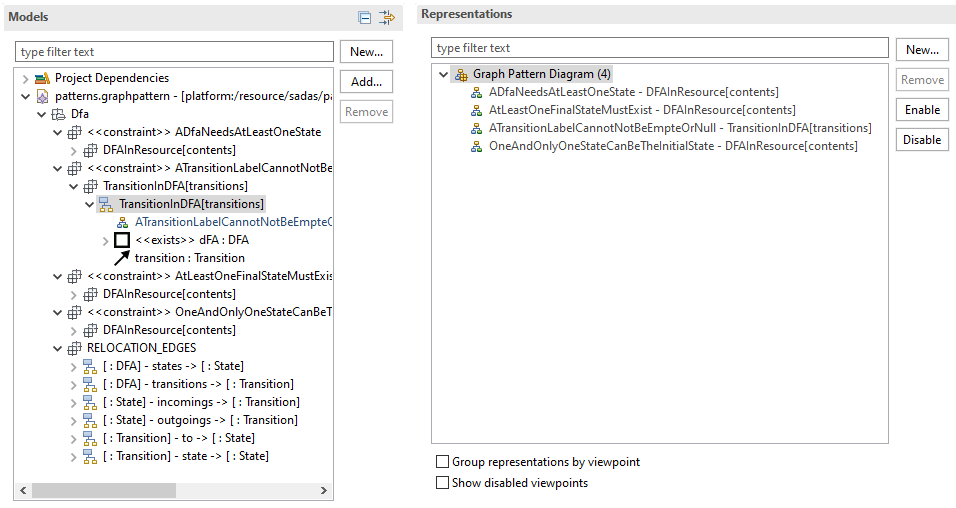
ReVision can generate edit rules from concrete modeling examples. A modeling example is translated into a graph pattern, which can be further modified and annotated by an edit rule developer. Such graph patterns are then combined into edit rules. Fig. 17 shows the catalog for the graph patterns, which can be opened for editing in a graphical editor. Details about this concept are described in our journal paper History-based Model Repair Recommendations.
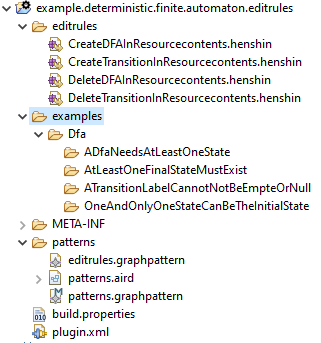
As shown in Fig. 18, the project contains the following files:
- editrules: The EMF Henshin graph transformation rules representing the edit rules.
- examples: The folder structure and the contained concrete modeling examples are automatically transformed into graph patterns (assuming Eclipse’s
Project -> Build Automaticallyis enabled). - patterns: Contains the graph patterns and an intermediate representation of the edit rules.
- patterns.aird: The graphical representation of the graph patterns.
- patterns.graphpattern: The model storing the graph patterns.
- editrules.graphpattern: An intermediate representation of the edit rules that are translated into Henshin rules.
(!) In order for ReVision to discover your edit rules, the constraint plug-in must be registered in the Eclipse instance in which you running the ReVision repair tool.
If you are in the workspace in which you developed your edit rules, you have to run a second Eclipse instance with that edit rule plug-in registered and loaded, e.g., from the plugin.xml -> Overview (Tab) -> Testing (Section) -> Launch an Eclipse application.
(!) To avoid nesting multiple Eclipse workspace instances (meta-model development -> constraint development -> edit rule development -> ReVision workspace), you can import (File -> Import -> Existing Projects into Workspace) the edit rules plug-in into your primary development workspace.
You can link the project instead of copying it.
Than start a second Eclipse instance from the primary workspace.
If you make changes to the configuration you may have to reload the second instance.
(Basically, edit rules will be dynamically reloaded, change to constraints are not.)
(!) For production, plug-ins can be deployed as drop-ins (File -> Export -> Plug-in Development -> Deployable plug-ins and fragments -> Destination: <the dropins folder of the Eclipse installation>) or as part of an Eclipse update site.